
Kubernetes 提供多種部署選擇,而在眾多工具中,kops 以其易用性及高整合性脫穎而出。本文將深入介紹 kops 工具,並透過實際操作引導讀者在 OpenStack 環境中迅速建立一個 Kubernetes 叢集。
kops 是什麼?
kops,即 Kubernetes Operations,正如其名,是一個專門用於 Kubernetes 叢集運維操作的工具。kops 的幾個主要特性如下:
- 支援建立、維護、升級和銷毀 Kubernetes 叢集
- 支援多個雲端平台,如 AWS、OpenStack/DigitalOcean(Beta)、Azure/GCP(Alpha)
- 可透過 kops 產生叢集的 Terraform 模板
- 管理 Kubernetes 叢集 plugin
- 自動化部署 Kubernetes 叢集。
kops 名詞
Storage
STATE_STORE
STATE STORE 定義了 kops 需要儲存其資料的地方,kops 會儲存的資料包含了 cluster spec、instance group 跟 ssh key 等。
API
Cluster spec
Cluster spec 定義了群集本身所需的一些 specification,例如群集中的 DNS、Load Balancer、etcd cluster 等資訊。
Instace Group
Instance Group 定義了實際 worker node、master node、etcd node 的一些相關資料,以 OpenStack 為例就是會建立的虛擬機所使用的 flavor、image 等。
Cloud
The Cloud
The Cloud 為不同雲端平台定義了統一的 golang interface,由於 kops 支援很多不同雲端環境,所以利用這個 interface 做 abstraction
Tasks
一個 task 就是對雲端環境操作的一個 API call
Model
Model 是將之前定義的 cluster spec 裡面的內容對應到實際的 task
例如說我們在 cluster spec 上定義了一個 load balancer ,那 loadbalancer model 就會將其對應到實際上建立一個 loadbalancer 所需要的各種 API call
安裝 kops
前置準備
安裝 kops 前需要安裝 kubectl,安裝方式請見此 官方文件
透過 homebrew 安裝
brew update && brew install kops透過官方編譯好的 release 安裝Linuxcurl -Lo kops https://github.com/kubernetes/kops/releases/download/$(curl -s https://api.github.com/repos/kubernetes/kops/releases/latest | grep tag_name | cut -d '"' -f 4)/kops-linux-amd64Mac
chmod +x kops
sudo mv kops /usr/local/bin/kopscurl -Lo kops https://github.com/kubernetes/kops/releases/download/$(curl -s https://api.github.com/repos/kubernetes/kops/releases/latest | grep tag_name | cut -d '"' -f 4)/kops-darwin-amd64自行編譯自行編譯的話請先確認環境內有安裝 golang,並且設定好 GOPATH 與 GOBIN
chmod +x kops
sudo mv kops /usr/local/bin/kops
git clone git@github.com:kubernetes/kops.gitLab:建立 Kubernetes Cluster下載 OpenStack CredentialNote
cd kops
make
請聯絡 admin 開啟 load balancer 使用權限
進入 OpenStack 面板 -> Identity / Application Credentials,在右上方選擇建立新的 Application Credential。
以 CNTUG Infra Lab 為例,該連結在 https://openstack.cloudnative.tw/identity/application_credentials/
建立完成後,點擊 Download openrc file,將會下載一個 Shell Script 檔案。
下載完成後,會需要將 RC file 的資訊放進 shell environment variable
source openrc.sh設定 kops STATE_STOREkops 會需要設定儲存資料的問題也就是上面提到的 STATE_STORE
export OS_DOMAIN_NAME=Default
由於 Infra Labs 有提供 Swift 服務,我們可以直接利用
export KOPS_STATE_STORE=swift://kops建立 Kubernetes Cluster Template接下來要利用 kops 建立 cluster 的資料,很簡單只需要一行指令:
Note請替換指令中 跟
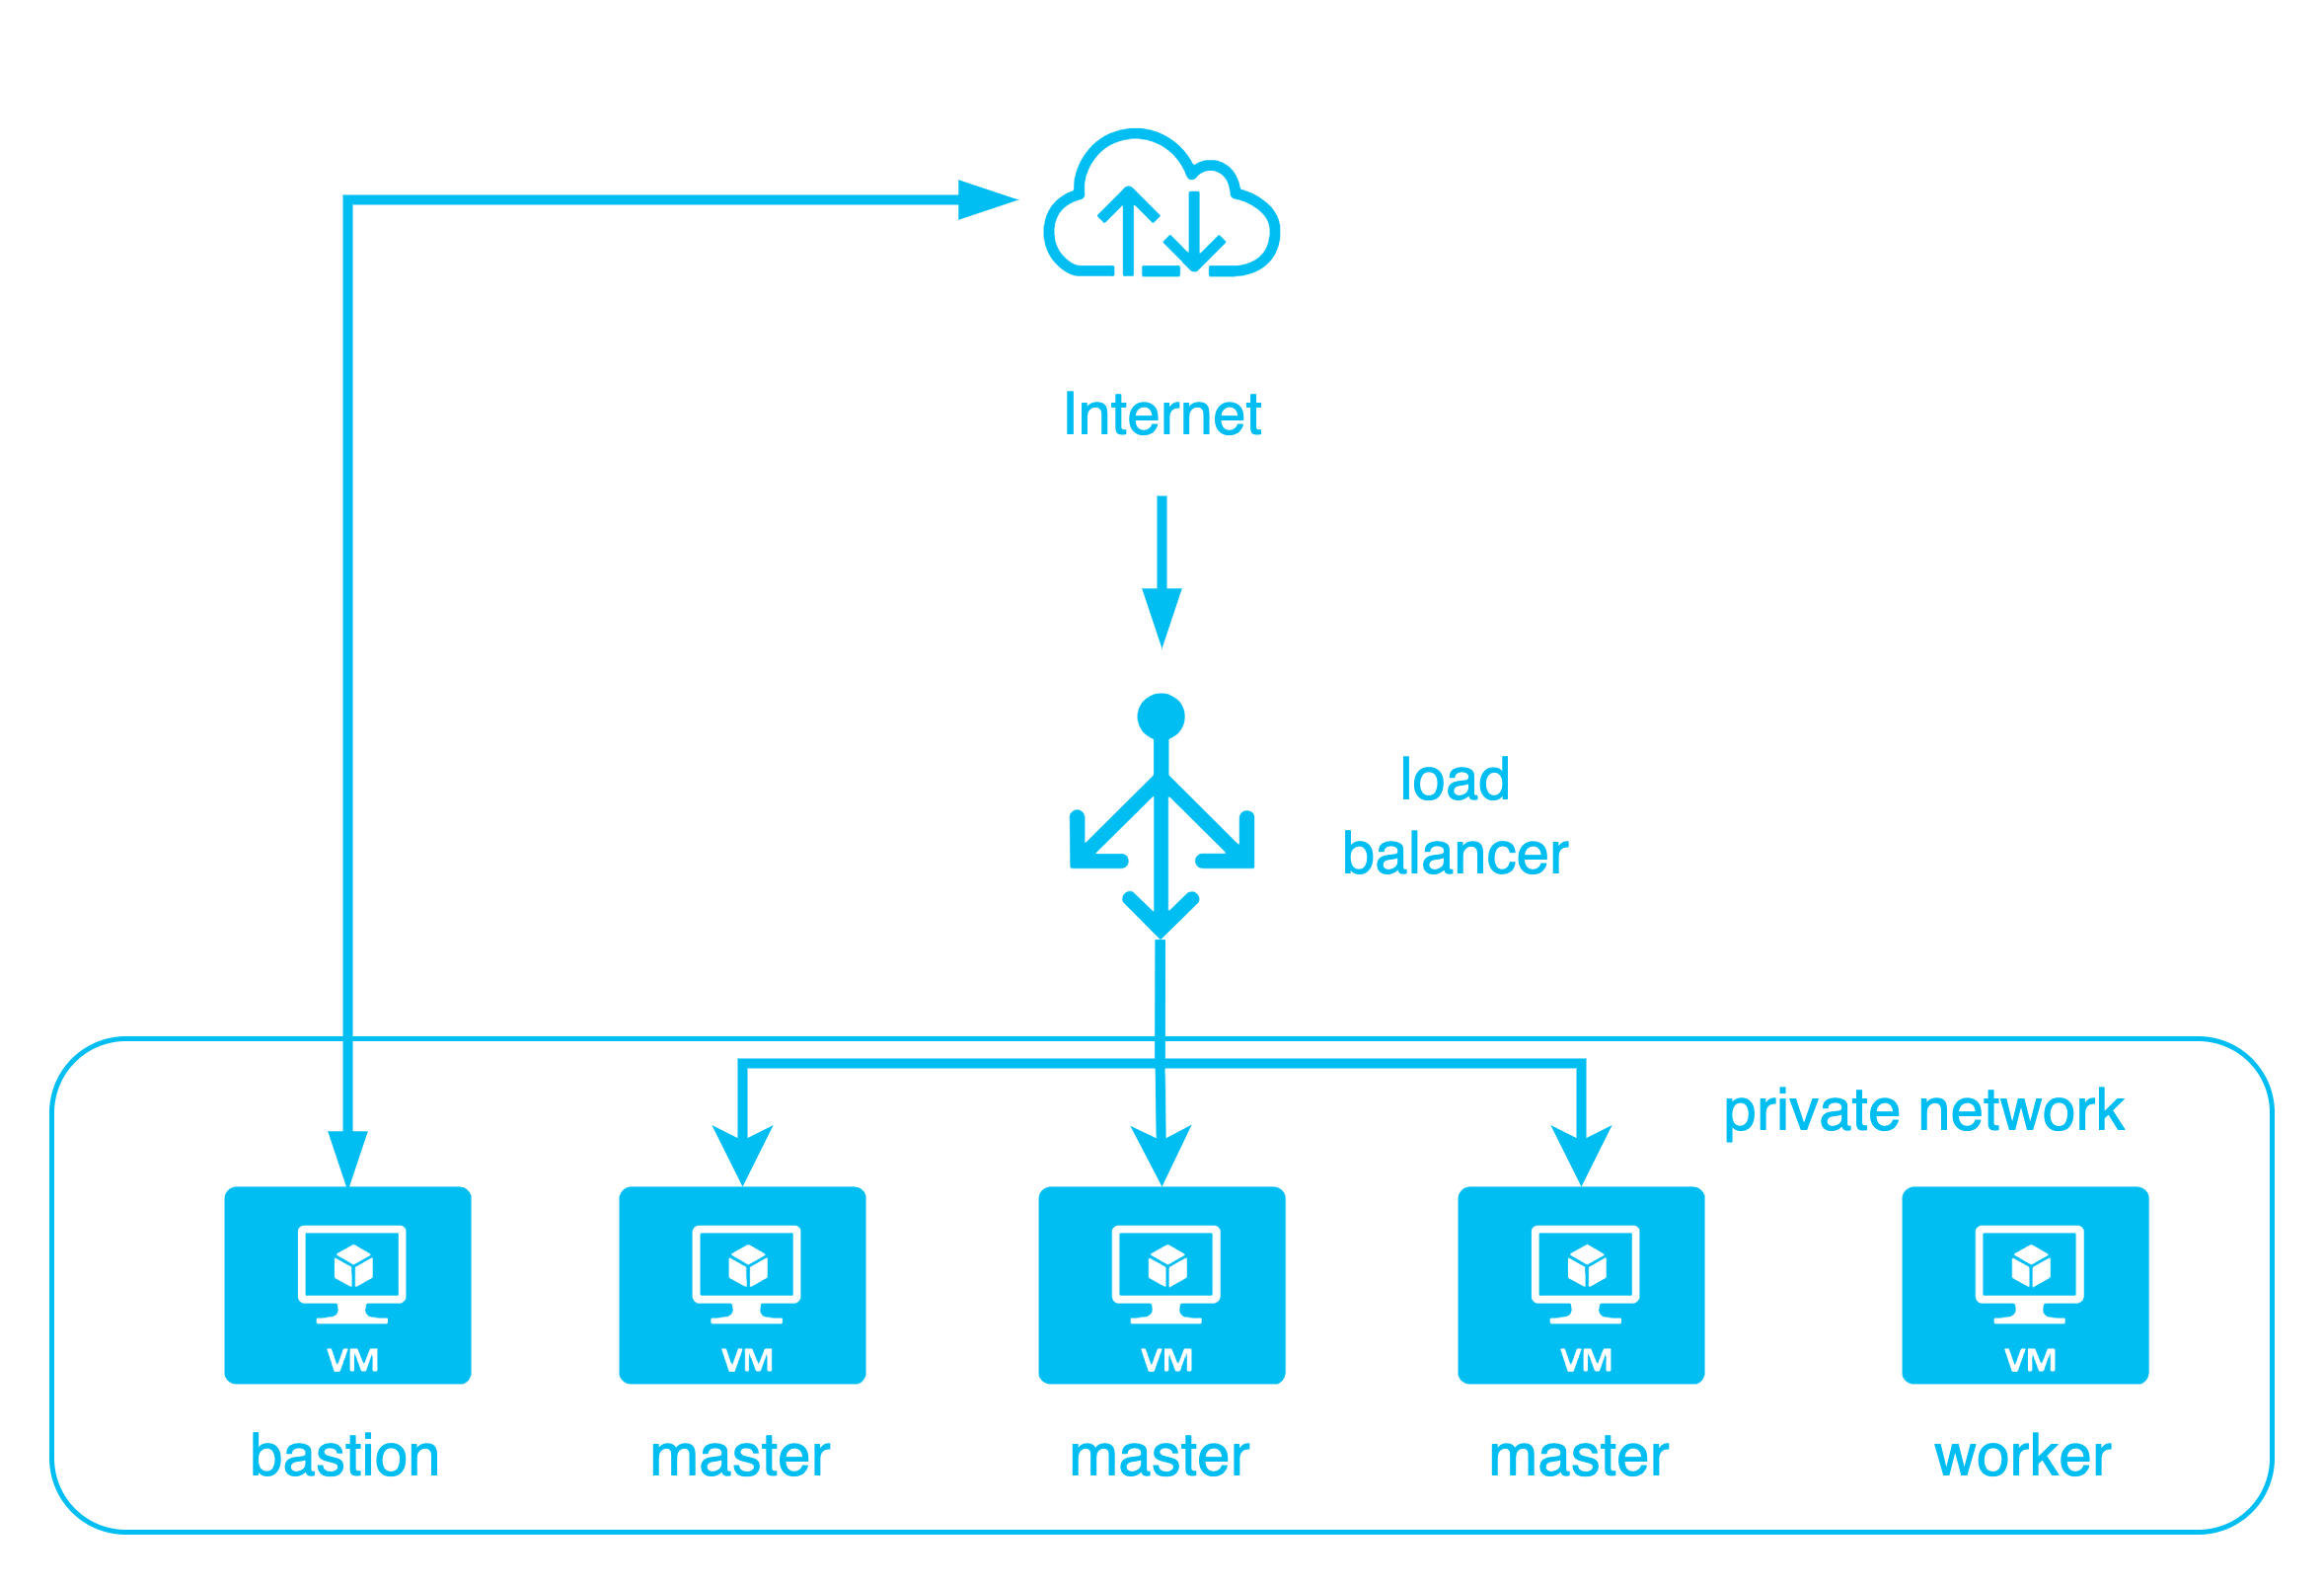
kops create cluster \本次 lab 中,我們會建立一個共 4 node 的 cluster,包含 3 個 master/etcd node 跟 1 個 work node。
--cloud openstack \
--name <cluster_name>.k8s.local \
--state ${KOPS_STATE_STORE} \
--zones nova \
--network-cidr 10.0.0.0/24 \
--image Ubuntu-22.04 \
--master-count=3 \
--node-count=1 \
--node-size m1.small \
--master-size m1.small \
--etcd-storage-type NVMe \
--api-loadbalancer-type public\
--topology private \
--bastion \
--ssh-public-key <ssh_key_path> \
--networking calico \
--os-ext-net public \
--os-dns-servers=8.8.8.8,8.8.4.4 \
--os-octavia=true \
--os-octavia-provider=ovn
架構圖如下:
kops create cluster 會建立 cluster spec, instance group 等等資料,接下來需要用 kops update cluster 來實際建立 Kubernetes cluster
kops update cluster --name <cluster_name> --yes --admin這時候 kops 就會開始呼叫 OpenStack API,建立 Kubernetes cluster 所需要的 VM,網路,硬碟,load balancer 等資源。結束後要等待大約 5-10 分鐘讓整個 cluster 啟動。
此時這個新建立的 Kubernetes cluster 的 config 會被寫入在 ~/.kube/config 下
Note若是在 update 中出現 409 error,並且 OpenStack Dashboard 上 load balancer 在 PENDING_UPDATE 狀態,請聯絡管理員
驗證 Kubernetes Cluster
最後我們可以驗證 Kubernetes Cluster 安裝成功。
kops validate cluster --wait 5m會得到以下 output
Validating cluster igene.k8s.local此時就可以利用
INSTANCE GROUPS
NAME ROLE MACHINETYPE MIN MAX SUBNETS
bastions Bastion m1.tiny 1 1 nova
master-nova-1 Master m1.small 1 1 nova
master-nova-2 Master m1.small 1 1 nova
master-nova-3 Master m1.small 1 1 nova
nodes-nova Node m1.small 1 1 nova
NODE STATUS
NAME ROLE READY
master-nova-1-nvhtbc master True
master-nova-2-jgnhbo master True
master-nova-3-vllcwf master True
nodes-nova-yxorvl node True
Your cluster igene.k8s.local is readykubectl 對 cluster 進行操作了。
使用 kops 安裝的 cluster 預設已經安裝 cloud-provider-openstack 並且整合了 Cinder CSI 和 Octavia Load Balancer 等功能。
kubectl get csidrivers.storage.k8s.io刪除 Kubernetes Clusterkops 紀錄了其建立在 OpenStack 上的所有資源,因此要摧毀 Kubernetes cluster 並且釋出資源非常簡單,只需一行指令:
NAME ATTACHREQUIRED PODINFOONMOUNT STORAGECAPACITY TOKENREQUESTS REQUIRESREPUBLISH MODES AGE
cinder.csi.openstack.org true true false <unset> false Persistent,Ephemeral 13h
kops delete cluster <cluster_name> --yeskops 將會刪除所有在 OpenStack 上建立的資源。
小結
在此次 lab 中,我們教學了如何利用 kops 在 OpenStack 上建立一個完整的 Kubernetes cluster。kops 搭建的 cluster 同時也整合了 cloud-provider-openstack 的相關功能,讓使用者可以在 cluster 內直接使用 persistant volume 和 load balancer 等功能。
後續與 Kubernetes 相關的 lab 也會建議利用此方法架設 Kubernetes cluster。
附錄
加入不同 Flavor 的 Instance
kops 可以透過 instance groups 加入不同 flavor 跟數量的 instance
Instance group 的 範例如下 :
apiVersion: kops.k8s.io/v1alpha2透過以下指令建立 instance group 並且更新 cluster 以建立新的 instance
kind: InstanceGroup
metadata:
labels:
kops.k8s.io/cluster: <cluster_name>.k8s.local
name: nodes-nova-arm
spec:
image: Ubuntu-22.04-aarch64
machineType: a1.large
maxSize: 1
minSize: 1
role: Node
subnets:
- nova
cat ig.yaml | kops create -f -新的 Instance 將會被建立然後加入至 cluster 中。
kops update cluster --name <cluster_name>.k8s.local --yes --admin


No comments yet